Wow! two consecutive weeks with blog entries.
This will be the first of my dedicated Frostgrave posts. As mentioned in my last post, this game has really got the nostalgia bug going in me for D&D type warband gaming. It also helps a lot that the game is a lot of fun too!
I have had a lot of great comments in person or on Facebook about my Frostgrave terrain. Rather than just use what I had on hand I set out to make "proper" terrain i.e. snow covered ruins for the game.
I wanted a really cluttered table as a terrain dense table makes for better games because some spells have unlimited range (Bone dart! Man I hate Bone Dart!). You need to break up line of sight (LOS) as much as possible.

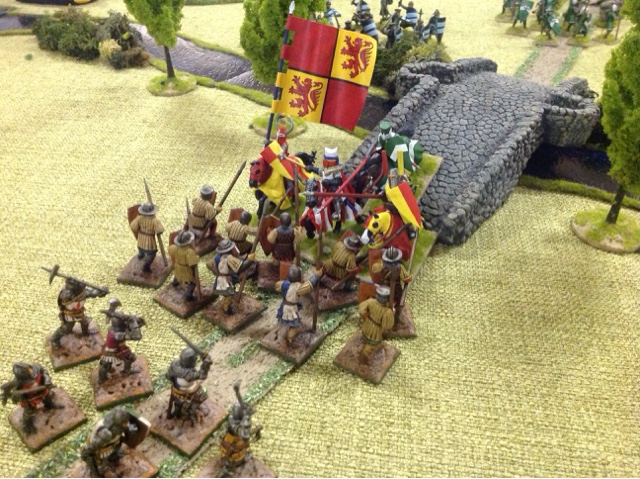
Explaining Frostgrave to a potential punter at Games Day 2016 - Nunawading Wargames Association
www.nwa.org.au

I also wanted to be able to make a lot of terrain quickly and not spend a lot of money. This post will outline how I went about making my terrain. What materials and tools I used and how I did it.
I am based in Melbourne, Australia so some of the materials and products may not be available in your area but you should be able to find something similar to what I use.
My basic idea was to use dense polystyrene foam to make the majority of the terrain. Its cheap. Its very light (which was important as I am not always gaming at home) and did I mention its cheap!
Polystyrene foam is a great terrain medium to work with but it can be very messy to work with if you have to carve/cut or sand the foam. You want to be able to cut and carve the foam without having a huge mess to clean up afterwards. This is where the most important tool comes into play...a hot wire cutter!
Now there are tutorials on the internet about how to make yourself a hot wire cutter with transformers and special wire but working with home made electrical stuff always scares the bejezzus out of me so I don't go near any of that. Especially when there are commercially available hotwire cutters that are not really expensive. Seriously you will be using this tool for years afterwards so get online and order a hot wire cutter!
The tool I use is just a straight piece of wire. There are other versions that are a kind of loop but I don't see the real benefit of that. The straight wire version is very easy to use and if you use it in conjunction with a metal ruler or straight piece of timber you can cut very straight long lines.
My cutter was purchased from Barnes in Richmond in Melbourne (for us Victorians) however the tool comes from the US and here is the website:
https://hotwirefoamfactory.com/035_4in_Hot_Knife.html
I purchased a sheet of 19mm dense white polystyrene foam (from Clark Rubber). The sheet cost me around about $20 or so and I think the dimensions were 900mm by 600mm. This one sheet of foam will easily make enough terrain for a 3 x 3 foot gaming board for Frostgrave. The polystyrene should be the dense stuff which cannot be easily broken into bits with your hands.
I also purchased a 900mm x 600mm sheet of 3mm MDF board which would form the bases for the polystyrene terrain pieces. If you cant get MDF then thin plywood or thick card will also work.
So plug in your hot wire cutter (you did buy one didn't you?) and wait five minutes for it to heat up.
We will start with something simple to start. Once you have the basics of cutting the foam sorted out you can scale up to bigger pieces and from then on you are only limited by your imagination.
One quick safety note: Cutting foam with a wire cutter produces some fumes as the foam burns so please do your cutting in a well ventilated area, preferably outside. You don't have to get sick for your hobby!
Starting at the edge of the foam sheet cut out an irregular shaped piece of foam maybe 15 centimeters long by about 10 centimeters high with one side being the flat edge of the sheet. As you slice through the foam move the wire back and forth so you are getting an irregular shaped cut. It is very easy as the hot wire goes through the foam like the proverbial knife through butter.
Once you have cut out your shape go back along the cut edge and with the wire slice off the squared edges and use the wire to put cracks and dents into the edge. You want the edge to look worn and crumbling.
Now we want to add a window in this ruined "wall". Push the wire point first into the foam and through the other side. With the wire still in the foam make a square or rectangle window shape. Pull the wire out of the foam and pop out the piece of foam with your finger. Don't throw that piece away as you can use it for rubble later. You now have your window. Don't be too precise with your cuts when doing this as we are trying to simulate ruins that are hundreds of years old. Messy is good!
Now we come to the slightly tricky part, putting in the brick pattern. To do this we will use the length of the wire but this time we will just lightly touch the surface of the foam to etch a straight line into the foam. Make a series of parallel lines evenly spaced along length of the wall and then do the same again at a right angle so you end up with a grid pattern on one side. Make sure you continue the brick pattern along the edges and inside the window. Try and line up these cuts with the grid pattern.
Now the technically minded will have observed that bricks are not laid like that. The brick layers are usually offset so they overlap each other. This gives the wall strength. Absolutely correct, but that is too much trouble! If you want to do that you can, it will just take a lot longer and the end result will not look that much better.
Now you can have some fun with the wire putting cracks into the foam and making pock marks, dents etc. This is the fun bit as the piece starts to take on some character. You will also by now be getting the hang of the wire cutter and what it can do for your terrain modeling.
The last thing I would do is take some aluminium foil and scrunch up a fist sized ball. Nice and densely packed. Now you can use this ball of foil to press into the foam and give the foam some texture. A nice piece of volcanic scoria rock also works well for this.
Congratulations you have made your first ruin!
Here is a picture of some of the first ruins I made with my cutter:


To glue the foam onto the MDF you could use PVA glue but I use a product called liquid nails (Selleys Liquid Nails). This is applied using a caulking gun. This glue is tacky enough to hold the foam in place so you can carry on with the next step. The liquid nails also gives a much stronger bond once cured.
Remember that piece of foam from the window? Use your cutter to put cracks etc. into that small piece of foam and then glue it to the base near your wall as a larger piece of rubble that has fallen to the ground.
Okay that is enough for today. Next up will be applying the basing texture, painting and applying the snow flock to finish.
Bye for now!